လုပ္ပုံလုပ္နည္း
1) ေအာက္ပါလမ္းေၾကာင္းအတိုင္းသြားလိုက္ပါ C:\WINDOWS\system32\drivers\etc
2) "hosts" ဆိုတဲ့ file ကိုရွာၾကည့္လိုက္ပါ
3) အဲဒီ file ကို notepad အေနနဲ႕ဖြင့္လိုက္ပါ
4) "127.0.0.1 localhost" ရဲ့ေအာက္ဘက္မွာ ကိုယ္ပိတ္ခ်င္တဲ့ web site address ကိုဒီလိုေလး႐ိုက္ထည့္ေပးပါ
127.0.0.2 www.sitenameyouwantblocked.com
ဒါဆိုရင္ အဲဒီဆိုက္ကို သင့္ကြန္ပ်ဴတာမွ လုံးဝ browse လုပ္၍ရမည္မဟုတ္ေတာ့ပါ
ကိုယ္ပိတ္ခ်င္တဲ့ website တိုင္းကို တခုျပီးတခု ႐ိုက္ထည့္ေပးလို႕ရပါတယ္။ internal ip (127.0.0.2) ရဲ့ေနာက္ဆုံးဂဏန္းကိုေတာ့ 1 တိုးေပးရပါမယ္။
ဥပမာ
127.0.0.1 localhost
127.0.0.2 www.cnn.com
127.0.0.3 www.bbc.com
127.0.0.4 www.rfa.com
etc.,
virus ထိေနေသာ computer ကိုကုစားရန္ မရွိမျဖစ္လိုအပ္ေသာ Tools 6 မ်ိဳး
|
က်ေနာ္တို႕ PC ေတြ ျပင္းထန္တဲ့ virus ထိတဲ့အခါ Task Manager
(taskmgr.exe), Registry Editor (regedit.exe), Command Prompt (cmd.exe), System Configuration Utility (msconfig.exe), Folder Options, Run from Start Menu အစရွိတဲ့ window built-in services ေတြကို virus က ျပင္လို႕မရေအာင္ပိတ္ထားတတ္ပါတယ္။ ကြၽမ္းက်င္သူမ်ားက registry ကေနဝင္ျပင္လို႕ ရေပမဲ့ registry နဲ႕မရင္းႏွီးသူမ်ားကေတာ့ registry မွာ မွားျပင္မိရင္ windows မတက္သည္အထိ ျဖစ္သြားႏိုင္ပါတယ္။ ဒီေတာ့ registry မွာ သြားျပင္စရာမလိုပဲ အဲဒီ Services ေတြ အစားသုံးလို႕ရတဲ့ Tools (6) မ်ိဳးကို မွ်ေဝေပးလိုက္ပါတယ္
Tools အမ်ားစုက portable ေတြ ျဖစ္ၾကျပီး USB Flash Drive ကေနတိုက္႐ိုက္ run လို႕ ရပါတယ္
1. Task Manager taskmgr.exe Replacement
2. Registry Editor regedit.exe Replacement
3. Command Prompt cmd.exe Replacement
4. Run Dialog Box Replacement
5. System Configuration Utility msconfig.exe Replacement
6. Enable Show hidden files and protected operating system files
Main features in FreeCommander:
Dual-panel technology - horizontal and vertical
Tabbed interface
Optional tree view for each panel
Built in file viewer to view files in hex, binary, text or image format
File viewer inside archives too
Built in archive handling: ZIP (read, write), CAB (read, write), RAR (read)
Nested archive handling
Built in FTP client
Easy access to system folders, control panel, desktop and start menu
Copy, move, delete, rename files and folders
Multi rename tool
Wipe files
Create and verify MD5 checksums
File splitting
File properties and context menu
Calculation of folder size
Folder comparison / synchronization
Modification of file date and attributes
Folder / program favorites
File searching (inside archive too)
File filters for display
User defined columns for detailed view
DOS command line
FreeCommander Guide
Tools အမ်ားစုက portable ေတြ ျဖစ္ၾကျပီး USB Flash Drive ကေနတိုက္႐ိုက္ run လို႕ ရပါတယ္
1. Task Manager taskmgr.exe Replacement
http://ifile.it/hleow902. Registry Editor regedit.exe Replacement
http://ifile.it/0i84fg63. Command Prompt cmd.exe Replacement
http://ifile.it/1py4qvo4. Run Dialog Box Replacement
http://ifile.it/hrengm25. System Configuration Utility msconfig.exe Replacement
http://ifile.it/v14j07q6. Enable Show hidden files and protected operating system files
Main features in FreeCommander:
Dual-panel technology - horizontal and vertical
Tabbed interface
Optional tree view for each panel
Built in file viewer to view files in hex, binary, text or image format
File viewer inside archives too
Built in archive handling: ZIP (read, write), CAB (read, write), RAR (read)
Nested archive handling
Built in FTP client
Easy access to system folders, control panel, desktop and start menu
Copy, move, delete, rename files and folders
Multi rename tool
Wipe files
Create and verify MD5 checksums
File splitting
File properties and context menu
Calculation of folder size
Folder comparison / synchronization
Modification of file date and attributes
Folder / program favorites
File searching (inside archive too)
File filters for display
User defined columns for detailed view
DOS command line
http://www.snapfiles.com/download/dlfreecommander.html
(or)
http://ifile.it/r340x28
FreeCommander Guide
http://www.freecommander.com/fc_guide_en.htmကိုယ့္မိတ္ေဆြ computer ရဲ့ အိုင္ပီကို သိေအာင္လုပ္နည္း
|
က်ေနာ္တို႕ေတြ တခါတရံ အင္တာနက္မွာ ခ်က္ၾကတဲ့အခါ ကိုယ္နဲ႕ခ်က္ေနတဲ့မိတ္ေဆြက
သူေျပာတဲ့ သူေနတဲ့ ႏိုင္ငံက တကယ္ဟုတ္မဟုတ္သိခ်င္ၾကပါတယ္။ ဒါဆိုရင္ ဘယ္လိုလုပ္ၾကမွာလဲ။ လြယ္ပါတယ္။ ကိုယ့္ခ်က္မိတ္ရဲ့ အိုင္ပီကိုသိေအာင္လုပ္ေပါ့။ ေအာက္မွာလုပ္ပုံလုပ္နည္း အေသးစိတ္ကိုေဖာ္ျပထားပါတယ္။
1) ေအာက္က IP-Finder file (PHP script) ေလးကိုေဒါင္းလိုက္ပါ။
2) ျပီးရင္ ေအာက္က ဆိုက္ကဲ့သို႕ PHP ကို support လုပ္တဲ့ free hosting တခုမွာ အေကာင့္ဖြင့္လိုက္ပါ
3) IP_Finder.ZIP file ကိုေျဖလိုက္ပါ။ ip.php နဲ႕ ip_log.txt ဖိုင္ႏွစ္ခုကို File Manager သုံးျပီး မိမိ ဟို႕တင္းရဲ့ root folder ေပၚ upload တင္လိုက္ပါ။
4) ip.php ကို မိမိၾကိဳက္ႏွစ္သက္ရာ နာမည္ေပးလို႕ရပါတယ္
5) ip_log.txt ရဲ့ permission ကို 777 ေပးလိုက္ပါ
အဲဒါအားလုံးျပီးသြားရင္ေတာ့ ip.php file ရွိတဲ့ လင့္ကို ကိုယ္အိုင္ပီသိခ်င္တဲ့ မိတ္ေဆြဆီ ပို႕ေပးလိုက္ပါ။
သင့္မိတ္ေဆြက အဲဒီလင့္ကို ကလစ္လိုက္တာနဲ႕ သူ႕ရဲ့အိုင္ပီက ip_log.txt. ဖိုင္မွာ မွတ္ျပီးျဖစ္ပါလိမ့္မယ္
ပိုမိုသိရွိနားလည္ဖို႕ ေအာက္က ဥပမာေလးကိုၾကည့္လိုက္ရေအာင္
သင္က X10hosting.com မွာ အေကာင့္ဖြင့္ထားျပီး သင့္ရဲ့ subdomain နာမည္က abc လို႕ယူဆရေအာင္။ ဒါဆိုသင့္ရဲ့ IP Finder link က ေအာက္ကလိုမ်ိဳးျဖစ္ေနပါလိမ့္မယ္။
http://abc.x10hosting.com/ip.php
သင္က ဒီလင့္ေလးကို သင္ အိုင္ပီသိခ်င္ေနတဲ့ မိတ္ေဆြက ကလစ္ေအာင္ေတာ့ စြမ္းေဆာင္ရပါလိမ့္မယ္။
သူကလစ္လိုက္ျပီဆိုတာနဲ႕ ip_log.txt file ထဲမွာ သူ႕ရဲ့ အိုင္ပီနဲ႕ သူကလစ္လုပ္တဲ့အခ်ိန္ကိုမွတ္သားေပးထားပါလိမ့္မယ္။ ျပီးရင္ သူမရိပ္မိေအာင္ google.com ဆီ အလိုအေလွ်ာက္ redirect လုပ္သြားပါလိမ့္မယ္။
မွတ္ထားတဲ့ အိုင္ပီ address log ကိုေအာက္ကလင့္မွာ သြားရွာႏိုင္ပါတယ္။
http://abc.x10hosting.com/ip_log.php
log ေတြက ေအာက္က format အတိုင္းျဖစ္ေနပါလိမ့္မယ္
73.92.144.237 Thursday 07th of May 2009 05:31:27 PM
52.45.144.237 Thursday 07th of May 2009 05:31:28 PM
122.92.144.237 Thursday 07th of May 2009 05:31:31 PM
မွတ္ခ်က္: abc ေနရာမွာ သင့္ရဲ့ subdoamin name ကိုအစားထိုးျပီးဖတ္ေပးပါရန္
1) ေအာက္က IP-Finder file (PHP script) ေလးကိုေဒါင္းလိုက္ပါ။
Code:
http://ifile.it/pdy1zim2) ျပီးရင္ ေအာက္က ဆိုက္ကဲ့သို႕ PHP ကို support လုပ္တဲ့ free hosting တခုမွာ အေကာင့္ဖြင့္လိုက္ပါ
Code:
http://x10hosting.com/3) IP_Finder.ZIP file ကိုေျဖလိုက္ပါ။ ip.php နဲ႕ ip_log.txt ဖိုင္ႏွစ္ခုကို File Manager သုံးျပီး မိမိ ဟို႕တင္းရဲ့ root folder ေပၚ upload တင္လိုက္ပါ။
4) ip.php ကို မိမိၾကိဳက္ႏွစ္သက္ရာ နာမည္ေပးလို႕ရပါတယ္
5) ip_log.txt ရဲ့ permission ကို 777 ေပးလိုက္ပါ
အဲဒါအားလုံးျပီးသြားရင္ေတာ့ ip.php file ရွိတဲ့ လင့္ကို ကိုယ္အိုင္ပီသိခ်င္တဲ့ မိတ္ေဆြဆီ ပို႕ေပးလိုက္ပါ။
သင့္မိတ္ေဆြက အဲဒီလင့္ကို ကလစ္လိုက္တာနဲ႕ သူ႕ရဲ့အိုင္ပီက ip_log.txt. ဖိုင္မွာ မွတ္ျပီးျဖစ္ပါလိမ့္မယ္
ပိုမိုသိရွိနားလည္ဖို႕ ေအာက္က ဥပမာေလးကိုၾကည့္လိုက္ရေအာင္
သင္က X10hosting.com မွာ အေကာင့္ဖြင့္ထားျပီး သင့္ရဲ့ subdomain နာမည္က abc လို႕ယူဆရေအာင္။ ဒါဆိုသင့္ရဲ့ IP Finder link က ေအာက္ကလိုမ်ိဳးျဖစ္ေနပါလိမ့္မယ္။
http://abc.x10hosting.com/ip.php
သင္က ဒီလင့္ေလးကို သင္ အိုင္ပီသိခ်င္ေနတဲ့ မိတ္ေဆြက ကလစ္ေအာင္ေတာ့ စြမ္းေဆာင္ရပါလိမ့္မယ္။
သူကလစ္လိုက္ျပီဆိုတာနဲ႕ ip_log.txt file ထဲမွာ သူ႕ရဲ့ အိုင္ပီနဲ႕ သူကလစ္လုပ္တဲ့အခ်ိန္ကိုမွတ္သားေပးထားပါလိမ့္မယ္။ ျပီးရင္ သူမရိပ္မိေအာင္ google.com ဆီ အလိုအေလွ်ာက္ redirect လုပ္သြားပါလိမ့္မယ္။
မွတ္ထားတဲ့ အိုင္ပီ address log ကိုေအာက္ကလင့္မွာ သြားရွာႏိုင္ပါတယ္။
http://abc.x10hosting.com/ip_log.php
log ေတြက ေအာက္က format အတိုင္းျဖစ္ေနပါလိမ့္မယ္
73.92.144.237 Thursday 07th of May 2009 05:31:27 PM
52.45.144.237 Thursday 07th of May 2009 05:31:28 PM
122.92.144.237 Thursday 07th of May 2009 05:31:31 PM
မွတ္ခ်က္: abc ေနရာမွာ သင့္ရဲ့ subdoamin name ကိုအစားထိုးျပီးဖတ္ေပးပါရန္
ကိုယ့္စက္က ဖိုင္ေတြကို USB Drives နဲ႕ကူးယူလို႕မရေအာင္ လုပ္ၾကမယ္
|
က်ေနာ္တို႕ေတြ တခါတေလ ကိုယ့္စက္ထဲက ေဒတာေတြကို သူမ်ားေတြ USB Drives နဲ႕ကူးသြားမွာမလိုလားဘူး။ အထူးသျဖင့္ လူဝင္လူထြက္မ်ားတဲ့ရုံးေတြမွာဆို ပိုဆိုးတယ္။ ဒါဆိုရင္ အဲလို USB Drives နဲ႕ ေကာ္ပီကူးလို႕မရေအာင္ Registry ထဲမွာသြားျပင္ၾကရေအာင္။
1) Start –> Run ကိုသြားလိုက္ပါ။ regedit လို႕ ႐ိုက္ျပီး Enter ေခါက္လိုက္ပါ။ 2) ဒီလမ္းေၾကာင္းအတိုင္း တဆင့္ျပီးတဆင့္သြားလိုက္ပါ “HKEY_LOCAL_MACHINE\SYSTEM\CurrentControlSet\Control” 3) key အသစ္တခုဖန္တီးလိုက္ျပီး StorageDevicePolicies လို႕ နာမည္ေပးလိုက္ပါ။ 4) StorageDevicePolicies ကို ေရြးျခယ္လိုက္ျပီး DWORD (32-bit) Value ကို ဖန္တီးလိုက္ပါ။ ျပီးရင္ အဲဒီ DWORD (32-bit) Value ကို WriteProtect ဆိုျပီး အမည္ေပးလိုက္ပါ။ 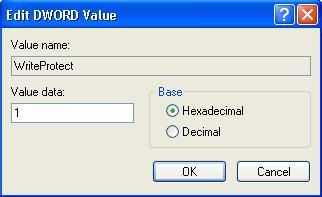 5) အဲဒီ WriteProtect ရဲ့တန္ဖိုးကို ပုံမွာ ျပထားတဲ့အတိုင္း " 1 " လို႕ေျပာင္းေပးလိုက္ပါ။ ျပီးရင္ Registry Editor ကိုပိတ္လိုက္ပါ။ တခါတရံ ကိုယ္ေျပာင္းထားတဲ့ setting အလုပ္လုပ္ဖို႕ computer ကို restart ခ်ေပးဖို႕လိုပါတယ္။ စက္ျပန္တက္လာတဲ့အခါ သင့္စက္ထဲက ဘယ္ဖိုင္ကိုမွ USB Drives ေတြနဲ႕ကူးလို႕ရမွာ မဟုတ္ေတာ့ပါဘူး။ ကူးလိုက္ရင္ေအာက္ပါအတိုင္း error message တက္ပါလိမ့္မယ္။ ဒီနည္းကို Window XP SP 2 မွ Vista အထိသုံးလို႕ရပါတယ္။ ဒါေပမဲ့ ဖိုင္ကူးမဲ့လူက administrator status ရထားရင္ေတာ့ ဒီ setting ကိုအလြယ္တကူျပန္ျပင္လို႕ရပါတယ္။
5) အဲဒီ WriteProtect ရဲ့တန္ဖိုးကို ပုံမွာ ျပထားတဲ့အတိုင္း " 1 " လို႕ေျပာင္းေပးလိုက္ပါ။ ျပီးရင္ Registry Editor ကိုပိတ္လိုက္ပါ။ တခါတရံ ကိုယ္ေျပာင္းထားတဲ့ setting အလုပ္လုပ္ဖို႕ computer ကို restart ခ်ေပးဖို႕လိုပါတယ္။ စက္ျပန္တက္လာတဲ့အခါ သင့္စက္ထဲက ဘယ္ဖိုင္ကိုမွ USB Drives ေတြနဲ႕ကူးလို႕ရမွာ မဟုတ္ေတာ့ပါဘူး။ ကူးလိုက္ရင္ေအာက္ပါအတိုင္း error message တက္ပါလိမ့္မယ္။ ဒီနည္းကို Window XP SP 2 မွ Vista အထိသုံးလို႕ရပါတယ္။ ဒါေပမဲ့ ဖိုင္ကူးမဲ့လူက administrator status ရထားရင္ေတာ့ ဒီ setting ကိုအလြယ္တကူျပန္ျပင္လို႕ရပါတယ္။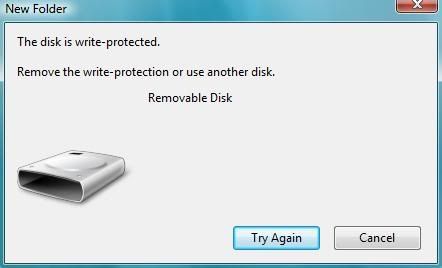 မွတ္ခ်က္။ ။ Registry တြင္ ဝင္ေရာက္ျပင္ဆင္ခ်င္းမွာ မွားလုပ္မိလွ်င္ Windows မတက္သည္အထိ ျဖစ္တတ္ေသာေၾကာင့္ မကြၽမ္းက်င္သူျဖစ္ပါက Registry ကို ၾကိဳတင္၍ backup လုပ္ထားရန္လိုအပ္ပါသည္။
Firefox ရဲ့ download speed ကို ျမႇင့္တင္ရေအာင္။
|
Firefox က default အေနနဲ႕ dial-up speeds ကို ထားထားတာပါ ။ သင္ဟာ high speed internet ကိုသုံးေနတာဆိုရင္ firefox ရဲ့ setting အနည္းငယ္ေျပာင္းေပးရုံနဲ႕ သင့္ရဲ့ download speed ေတာ္ေတာ္ေလးျမန္လာတာကိုေတြ႕ရပါလိမ့္မယ္။ Firefox ရဲ့ number of connections ကိုေျပာင္းခ်င္းျဖစ္လဲ သင့္ရဲ့ bandwidth ကို အၾကီးအက်ယ္တိုးေပးပါလိမ့္မယ္။ သင္ ဖိုင္ size ၾကီးၾကီးေဒါင္းေလ သင့္ download speed ပိုျမန္လာေလ ျဖစ္ပါလိမ့္မယ္။
1) Firefox connection setting ကိုေျပာင္းေပးဖို႕ about:config ကို Firefox ရဲ့ address bar မွာ႐ိုက္ထည့္လိုက္ပါ။
2) "Filter:" bar မွာ persistent ဆိုျပီး႐ိုက္ထည့္လိုက္ပါ
3) ေအာက္ကအတိုင္း preference names ႏွစ္ခုကို သူတို႕ရဲ့တန္ဖိုးနဲ႕တြဲျပီးျမင္ရပါမယ္
network.http.max-persistent-connections-per-proxy user set interger 8
network.http.max-persistent-connections-per-server user set interger 6
4) အဲဒီ preference name တခုဆီမွာ Double click ႏွိပ္လိုက္ပါ။ တန္ဖိုးခ်ိန္းေပးဖို႕ pop-up window ေလးတက္လာပါလိမ့္မယ္။ သင္အသုံးျပဳေနတဲ့ internet connection က cable သို႕မဟုတ္ DSL ဆိုရင္ 20 နဲ႕ 30 ၾကားထဲက နံပါတ္တခုခုကို ထည့္ေပးလိုက္ပါ။ (ကိုယ့္ connection speed ကိုလိုက္ျပီး အဲဒီ အတြင္းမွာ အတိုးအေလွ်ာ့လုပ္ၾကည့္ပါ။ ) ျပီးရင္ OK ကိုႏွိပ္လိုက္ပါ။
5) Firefox ကို Restart ခ်လိုက္ပါ။ file ေတြပိုမ်ားမ်ားကို တျပိဳင္တည္း download လုပ္လို႕ရႏိုင္ျပီး download speed လဲ ေတာ္ေတာ္ တက္လာတာကိုေတြ႕ရပါလိမ့္မယ္။
notepad ထဲမွာ စာေတြဖြက္ၾကမယ္
|
command prompt ကိုအသုံးျပဳျပီး text file ထဲမွာ စာေတြကိုဖြက္လို႕ရပါတယ္။ အဲဒီလိုလုပ္ဖို႕ သင့္ partition system က NTFS ျဖစ္ဖို႕ေတာ့လိုပါလိမ့္မယ္။
1) command prompt ကိုဖြင့္ဖို႕ အတြက္ Start–>Run မွာ cmd လို႕႐ိုက္ထည့္ျပီး Enter ေခါက္ပါ
2) ၾကိဳက္တဲ့ directory (C:\> or D:\>) ကိုသုံးႏိုင္ပါတယ္ ဒီမွာေတာ့ D:\> ကိုသုံးျပပါမယ္။
3) command prompt မွာေအာက္ကကုဒ္ကို႐ိုက္ထည့္လိုက္ပါ။
D:\>notepad mmso.txt:hidden
mmso ေနရာမွာ ကိုယ္ၾကိဳက္တဲ့နာမည္ေပးလို႕ရပါတယ္
4)ေပၚလာတဲ့ mmso notepad ကို save လုပ္လိုက္ပါ
5) mmso notepad ျဖစ္သြားပါလိမ့္မယ္
6) အဲဒီ notepad မွာ စာအခ်ိဳ႕ေရးျပီး save လိုက္ပါ။
7) D:\> ေအာက္သြားျပီး အဲဒီ notepad ကို ဖြင့္ၾကည့္လိုက္ပါ။ ႐ိုက္ထားတဲ့စာေတြေတြ႕ရမွာမဟုတ္ေတာ့ပါဘူး
 စာေတြကိုျပန္ေတြ႕ခ်င္ရင္ command prompt ကိုသြားျပီး ေအာက္ကအတိုင္း ထပ္႐ိုက္ထည့္လိုက္ပါ။
D:\>notepad mmso.txt:hidden
mmso notepad ေပၚလာျပီး ဖြက္ထားတဲ့ စာေတြပါ ျပန္ေဖာ္ျပေပးပါလိမ့္မယ္
1) command prompt ကိုဖြင့္ဖို႕ အတြက္ Start–>Run မွာ cmd လို႕႐ိုက္ထည့္ျပီး Enter ေခါက္ပါ
2) ၾကိဳက္တဲ့ directory (C:\> or D:\>) ကိုသုံးႏိုင္ပါတယ္ ဒီမွာေတာ့ D:\> ကိုသုံးျပပါမယ္။
3) command prompt မွာေအာက္ကကုဒ္ကို႐ိုက္ထည့္လိုက္ပါ။
D:\>notepad mmso.txt:hidden
mmso ေနရာမွာ ကိုယ္ၾကိဳက္တဲ့နာမည္ေပးလို႕ရပါတယ္
4)ေပၚလာတဲ့ mmso notepad ကို save လုပ္လိုက္ပါ
5) mmso notepad ျဖစ္သြားပါလိမ့္မယ္
6) အဲဒီ notepad မွာ စာအခ်ိဳ႕ေရးျပီး save လိုက္ပါ။
7) D:\> ေအာက္သြားျပီး အဲဒီ notepad ကို ဖြင့္ၾကည့္လိုက္ပါ။ ႐ိုက္ထားတဲ့စာေတြေတြ႕ရမွာမဟုတ္ေတာ့ပါဘူး
စာေတြကိုျပန္ေတြ႕ခ်င္ရင္ command prompt ကိုသြားျပီး ေအာက္ကအတိုင္း ထပ္႐ိုက္ထည့္လိုက္ပါ။D:\>notepad mmso.txt:hidden
mmso notepad ေပၚလာျပီး ဖြက္ထားတဲ့ စာေတြပါ ျပန္ေဖာ္ျပေပးပါလိမ့္မယ္
ပုံေတြထဲမွာ စာေတြဝွက္နည္း
|
တခါတုန္းက အိုင္တီဖြင့္ျဖိဳးတဲ့ ရြာေလးတရြာမွာေလ သိပ္ခ်စ္ၾကတဲ့ ခ်စ္သူႏွစ္ဦး ျဖစ္ၾကတဲ့ ကင္းေကာင္ဆိုတဲ့ေကာင္ေလးနဲ႕ ပြင့္ဆိုတဲ့ ေကာင္မေလး ႏွစ္ဦးရွိၾကတယ္တဲ့။ ပြင့္ရဲ့မိဘေတြက သူတို႕သမီးကို ကင္းေကာင္နဲ႕သေဘာမတူၾကဘူး။ အေၾကာင္းကေတာ့ ဝလို႕တဲ့ေလ။  ကင္းေကာင္နဲ႕ဆက္သြယ္လို႕မရေအာင္ အိမ္မွာပိတ္ထားတဲ့အျပင္ အြန္လိုင္းကပါဆက္သြယ္လို႕မရေအာင္ အီးေမးေတြကိုပါ သူတို႕လက္ကျဖတ္ျပီး ေသခ်ာစစ္ေဆးျပီးမွ သူတို႕သမီးကိုေပးဖတ္တာ။ အဲဒီမွာကင္းေကာင္လဲ အၾကံရခက္သြားတယ္။ ဒါေပမဲ့သူလဲေခသူမွမဟုတ္တာ။ ရြာသာၾကီးက ကြန္ပ်ဴတာဘြဲ့ရလာတဲ့အေကာင္ပဲ။ ဒီေလာက္ေတာ့ ပ်င္းေတာင္ပ်င္းေသးတယ္ဆိုျပီး သူက ေကာင္မေလးရဲ့ သူငယ္ခ်င္းနာမည္ဆင္တူသုံးျပီး ဂ်ီေမးအေကာင့္ဖြင့္လိုက္တာေပါ့။
ျပီးရင္ သူ႕စာေတြကို အေယာင္ေဆာင္ပို႕ဖို႕အတြက္ ေကာင္မေလး ပံုတစ္ပံုေရြးလိုက္ပါတယ္။ ျပီးရင္ myphoto လို႕နာမည္ေပးပါတယ္။ အဲဒီပံုကို C:\ (C directory) ေအာက္မွာခဏထားလိုက္ပါတယ္။
သူရးခ်င္တဲ့စာကို Notepad နဲ႕ ေရးလိုက္ပါတယ္။ ၿပီးရင္ အဲဒီ Notepad ကို C:\ ေအာက္မွာပဲ myletter နာမည္နဲ႕ save မွတ္လိုက္ပါတယ္။
အားလုံးျပီးသြားရင္ Command Prompt ကို ဖြင့္ျပီး သူ႕ file ေတြ သိမ္းထားတဲ့ directory ( C:\) ကိုသြားျပီး ေအာက္ကအတိုင္း႐ိုက္ထည့္လိုက္ပါတယ္။
copy /b myphoto.jpg + myletter.txt combine.jpg
combine.jpg ဆိုတဲ့နာမည္နဲ႕ ပုံအသစ္တပုံ အဲဒီ C:\ ေအာက္မွာပဲေပၚလာပါမယ္။
ကင္းေကာင္က အဲဒီ combine ဆိုတဲ့ပုံေလးကို ပြင့္ဆီ အီးေမးကေနပို႕လိုက္ပါတယ္။ ထုံးစံအတိုင္း ပြင့္အိမ္ကလူေတြက ပုံကို double click ႏွိပ္ျပီးၾကည့္လိုက္ေတာ့ ေကာင္မေလးပုံဆိုေတာ့ ပြင့္ကို လက္ဆင့္ကမ္းေပးလိုက္တာေပါ့။ ပြင့္က အဲဒီပုံကို Right Click ႏွိတ္ျပီး open with နဲ႕ notepad အေနနဲ႕ဖြင့္ၾကည့္လိုက္မွ ကုဒ္ေတြရဲ႕ ေနာက္ဆံုးမွာ သူ႕ကိုကိုကင္းေကာင္ရဲ႕ အခ်စ္စာလႊာေလးကို ေတြ႕ရွိရမွာ ျဖစ္ပါတယ္။
ကင္းေကာင္နဲ႕ဆက္သြယ္လို႕မရေအာင္ အိမ္မွာပိတ္ထားတဲ့အျပင္ အြန္လိုင္းကပါဆက္သြယ္လို႕မရေအာင္ အီးေမးေတြကိုပါ သူတို႕လက္ကျဖတ္ျပီး ေသခ်ာစစ္ေဆးျပီးမွ သူတို႕သမီးကိုေပးဖတ္တာ။ အဲဒီမွာကင္းေကာင္လဲ အၾကံရခက္သြားတယ္။ ဒါေပမဲ့သူလဲေခသူမွမဟုတ္တာ။ ရြာသာၾကီးက ကြန္ပ်ဴတာဘြဲ့ရလာတဲ့အေကာင္ပဲ။ ဒီေလာက္ေတာ့ ပ်င္းေတာင္ပ်င္းေသးတယ္ဆိုျပီး သူက ေကာင္မေလးရဲ့ သူငယ္ခ်င္းနာမည္ဆင္တူသုံးျပီး ဂ်ီေမးအေကာင့္ဖြင့္လိုက္တာေပါ့။ျပီးရင္ သူ႕စာေတြကို အေယာင္ေဆာင္ပို႕ဖို႕အတြက္ ေကာင္မေလး ပံုတစ္ပံုေရြးလိုက္ပါတယ္။ ျပီးရင္ myphoto လို႕နာမည္ေပးပါတယ္။ အဲဒီပံုကို C:\ (C directory) ေအာက္မွာခဏထားလိုက္ပါတယ္။
သူရးခ်င္တဲ့စာကို Notepad နဲ႕ ေရးလိုက္ပါတယ္။ ၿပီးရင္ အဲဒီ Notepad ကို C:\ ေအာက္မွာပဲ myletter နာမည္နဲ႕ save မွတ္လိုက္ပါတယ္။
အားလုံးျပီးသြားရင္ Command Prompt ကို ဖြင့္ျပီး သူ႕ file ေတြ သိမ္းထားတဲ့ directory ( C:\) ကိုသြားျပီး ေအာက္ကအတိုင္း႐ိုက္ထည့္လိုက္ပါတယ္။
copy /b myphoto.jpg + myletter.txt combine.jpg
combine.jpg ဆိုတဲ့နာမည္နဲ႕ ပုံအသစ္တပုံ အဲဒီ C:\ ေအာက္မွာပဲေပၚလာပါမယ္။
ကင္းေကာင္က အဲဒီ combine ဆိုတဲ့ပုံေလးကို ပြင့္ဆီ အီးေမးကေနပို႕လိုက္ပါတယ္။ ထုံးစံအတိုင္း ပြင့္အိမ္ကလူေတြက ပုံကို double click ႏွိပ္ျပီးၾကည့္လိုက္ေတာ့ ေကာင္မေလးပုံဆိုေတာ့ ပြင့္ကို လက္ဆင့္ကမ္းေပးလိုက္တာေပါ့။ ပြင့္က အဲဒီပုံကို Right Click ႏွိတ္ျပီး open with နဲ႕ notepad အေနနဲ႕ဖြင့္ၾကည့္လိုက္မွ ကုဒ္ေတြရဲ႕ ေနာက္ဆံုးမွာ သူ႕ကိုကိုကင္းေကာင္ရဲ႕ အခ်စ္စာလႊာေလးကို ေတြ႕ရွိရမွာ ျဖစ္ပါတယ္။
Subscribe to:
Comments (Atom)
